
A Space is an InSpace session with a unique link you can share. Learn how to create a Space on your InSpace Dashboard.
All InSpace hosts can create Spaces to host sessions. You must have an InSpace subscription to host sessions (sign up for a free trial here - no card needed).
Inviting others to attend your sessions is as simple as sharing the link with them, or you can create calendar invitations using our integration.
Let's learn how to create and customize your Space!
How to Create a Space
- Visit the InSpace Dashboard and sign into your InSpace account.
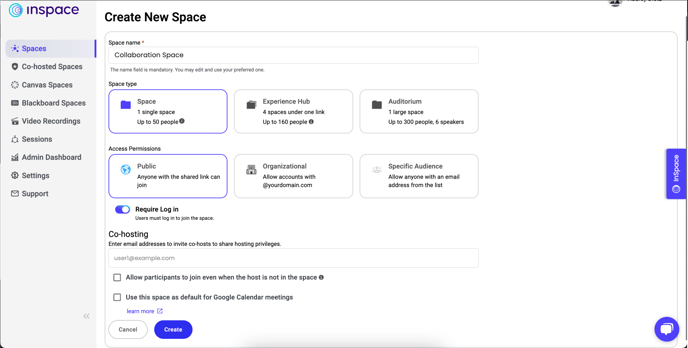
- Press the purple Create Space button at the top right of your screen.
- Give your space a name. Your guests will see this name, so make sure it makes sense for you and your session attendees!
- Select a space type. InSpace offers single group spaces, connected Experience Hubs, and Auditoriums. Learn more about the different Space types and their capacity here.
- Set the access permissions. The default setting is Public, which means that anyone who has the link to your Space and who has logged into their free InSpace account may join. Learn more about the different Access Permissions here.
- Add co-hosts to your space by typing their email addresses. Co-hosts are able to start your sessions and facilitate gatherings just like you can. Co-hosts may not add more co-hosts. To learn more about what hosts and co-hosts can do, please consult this article.
- The 'Allow participants to join even when the host is not in the space' checkbox is left unchecked by default. Checking the box means that anyone may click on your link anytime and open the space to start a session. In some cases, this is helpful, such as asynchronous communities of practice for adult learners or study halls for college students (in these examples, check the box). This box should be left unchecked in other situations requiring supervision, such as an Experience Hub offering after-school clubs for K-12 students.
- The checkbox 'Use this space as default for Google Calendar meetings' links the newly-created space to your Google Calendar integration for InSpace and makes the new space your default location for Google Calendar virtual meetings. Learn more about how to install the Google Calendar integration here.
- When you are ready, press Create!
- Now you can copy & paste the link to your space to invite others to your Space!
Now that your space is created, it's time to customize!
- Learn how to create a custom background for your space
- Learn how to customize the Experience Hub
- Adjust the space and add breakout rooms, including nested breakout rooms in the Experience Hub and locked breakout rooms.
Explore our integrations and interactive features:
Integrations
Collaborate in context with InSpace’s integrations. Use them with the whole group or in your breakouts.
📂 PDF & PowerPoint Cloud Share
In-Session Features
These features help your session run smoothly and engage all participants!