
Learn how to set up and activate InSpace Campus LTI 1.3 for Canvas in your institution using our comprehensive guide. Get started today!

Notes:
- By default, when the Experience Hub is integrated, the same Experience Hub will be placed in all courses upon installation.
- The integration admin will be the Experience Hub host. Unlimited co-hosts can be added to the Space.
- This integration does not have a user limit - it can be installed in LMS courses of any size.
- The Experience Hub chat operates as follows:
- The “All-participants” channel will be hidden in the chat.
- TAs and teachers are enrolled in all sections (if applicable).
- In the DM section users will see other users who are enrolled in the same section.
- When creating a channel users will see other users who are enrolled in the same section.
- In the space in the direct messages users will see other users who are enrolled in the same section and users who are in the space at the time.
Step 1: Configure InSpace Campus LTI 1.3 for Canvas
1.1 Navigate to Developer Keys in your root account in Canvas.
1.2 Click on the "+ Developer Key" button.
1.3 Choose "+ LTI Key" option.
1.4 Fill the "Key Name" field with "InSpace Key".
1.5 Select "Enter URL" as "Method".
1.6 In the "JSON URL" field paste the following URL:
- https://api.inspace.chat/lti-13/config-advising-default-enabled.json -- if the InSpace integration should be enabled by default for all courses. If you select this option, InSpace will automatically appear in the Course Navigation Menu.
-
https://api.inspace.chat/lti-13/config-advising-default-disabled.json -- if the InSpace integration shouldn't be enabled by default for all courses. If you select this option, instructors will need to go to Settings > Navigation, and drag InSpace into the visible area, then save their settings for the Course Navigation Menu.
1.7 Click "Save".
1.8 Set state to ON for the "InSpace Key" developer key.
1.9 Copy the number from the Details column. This is your “Client ID”.
Step 2: Install the LTI at the Root Level, into Sub-Accounts or Specific Course(s)
2.1 Navigate to account, a sub-account or course [specific course] settings.
2.2 Select the Apps tab, then click View App Configurations.
2.3 Click on “+Add”
2.4 Select “By Client ID” as Configuration Type.
2.5 Paste in the Client ID you copied in step 9 above into the Client ID field.
2.6 Click "Submit."
2.7 Click "Install."
2.8 Click on the gear icon, select Deployment ID.
Step 3: Configure the API key for Canvas (required for Campus Integration)
3.1 Navigate to Developer Keys in your root account in Canvas.
3.2 Click on the “+ Developer Key” button.
3.3 Choose the “+ API Key” option.
3.4 Fill the “Key Name” field with “InSpace Canvas Key."
3.5 Fill the “Redirect URIs” field with https://api.inspace.chat/lms/canvas/oauth2response
3.6. Move "enforce scope"...
3.7 Check "Allow include parameters"
3.8 In the permissions list, scroll to 'Enrollments,' expand it, and check "url:GET|/api/v1/courses/:course_id/enrollments"
3.9 Click “Save.”
3.10 Set state to ON for the “InSpace Key” developer key.
3.11 Copy the number from the Details column. This is your “API Client ID.”
3.12 Click on the “Show Key” button from the “Details” column, and copy the value in the popup. This is your “API Client Secret."
Step 4: Activate the InSpace integration in every course where you want to use the LTI Campus Integration.
4.1 Open each course and navigate to the Canvas Navigation Menu Bar. If necessary, open Settings > Navigation, and move InSpace to the Active tools area, then press Save.
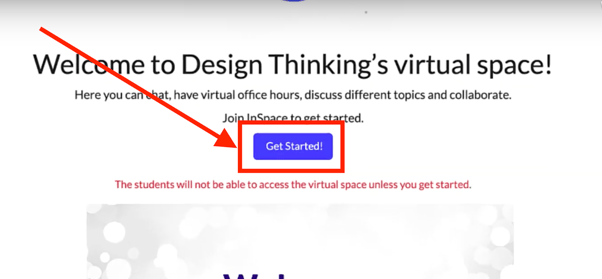
4.2 After InSpace is visible in the left side Canvas Navigation Menu, click InSpace. You will see the InSpace Classroom Integration appear. Click the purple Get Started button.
4.3 Repeat this step for every course where you want the Campus LTI to appear.
Step 5: Share your integration information with your InSpace customer success manager.
5.1 To complete the integration, contact your InSpace customer success manager and share the following information with them.
- The name of your integration (how you'd like the integration to appear in the Canvas Navigation Menu)
- The URL(s) used for your institution's Canvas instance, including any Canvas vanity URLs or redirects.
- The Client ID you created in step 1.9.
- The Deployment ID you created in step 2.8.
- The API Client ID and API Client Secret from steps 3.11 and 3.12.
- The email address of the individual who should be the Campus LTI space 'manager' or primary host. This person can add co-hosts who can also launch and run the space, but the primary host is the only person who can delete the space and add more co-hosts. Learn more about what hosts and co-hosts can do here.
Other Situations:
- If you'd like to test InSpace's LTI with a Test or Beta instance of Canvas, you will need to request that your Instructure account representative enable "Beta and Test Access for Students". This resolves a bug in how Canvas’s Test/Beta instance handles the Names and Roles feature in LTI 1.3. You can request that your Instructure account rep disable this feature after you complete your testing.